Preparing for the Handoff
Posted December 14, 2011
Organize your project files and get it ready to archive or share
Reworking or updating projects from other designers is an incredibly common occurrence for those working in large design teams or those with a large archive of project files. Organizing your working directory and properly packaging a finalized project makes it easier for whoever needs the files next (either another designer or yourself later). I also see it as a professional courtesy for other designers (similar to properly naming and organizing layers in Photoshop/Illustrator or styles in InDesign).
Organize your working directory
This part is really just to help you during a project, unless you are working collaboratively with another designer, in which case proper organization is even more important.
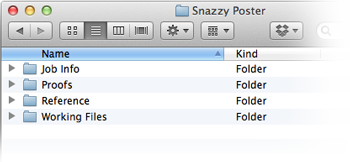
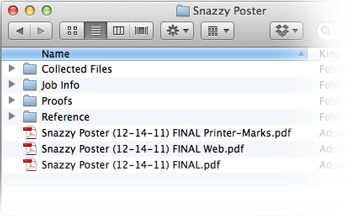
I create a standard set of folders for every project:
| Folder name | Folder contents |
| Working Files | All source files (edited images, Photoshop/Illustrator/InDesign documents) |
| Reference | For content as provided by the client (usually Word, Excel, PowerPoint or PDF files) |
| Job Info | Quotes from commercial printers or vendors, as well as other information related to producing the final output |
| Proofs | All project proofs (individual files are dated and labeled *PROOF*) |
 This structure should take care of most items while working on your project – it keeps your project directory from becoming a digital junk drawer in a simple and non-invasive way.
Proofs and file-naming
 I save all proofs for an ongoing project, at least until the project is complete – I also explicitly name them both for my own use and to clearly differentiate the various document states to clients.
My naming structure consists of the following elements:
- Descriptive name (usually client name followed by project name)
- Date in YYYY-MM-DD format
- Document state (PROOF or FINAL)
- Optional: document variation (Printer-Marks, Spreads, Web, etc.)
It usually looks like this:
Snazzy Poster (2011-12-14) PROOF.pdf
Descriptive name
The descriptive name is pretty self-explanitory. Feel free to drop the client name if it makes the filename too long and the project title is descriptive enough.
Date
While many designers know how to sort files by their creation date, I’ve found most clients don’t. Including the date in the filename makes it simple to differentiate various proofs, automatically adds chronological ordering and keeps you away from the trap of adding new, new new, etc. to filenames.
I chose the MMMM-DD-YY date format because keeps files in the correct order, even when a project spans a break between years.
Document state
I add PROOF or FINAL to all PDF proofs and final files. It’s easier and faster than watermarking files and helps you keep track of a project’s status (very helpful if you’re juggling many projects). Since most clients don’t keep as structured of a filing system as I do, it helps them keep track of the correct files and ensures they don’t accidentally use an older proof.
Document variation
This may or may not be necessary depending on your project and its eventual use. Many of my projects will be sent to a commercial print shop, which needs crop, bleed and registration marks in the file – I label these Printer-Marks. I always generate a full-resolution version of the document without those marks for the client to keep in their files – this version does not need an additional label. Since the full-resolution version is usually unnecessarily large for sharing through email or online, I generate a screen-resolution version, labeled Web, as well. Other variations include Spreads and 2-up/3-up/x-up.
Packaging final files
Once the final files have been generated and the project is complete, it’s time to gather all the dependent assets into a single folder. The process is slightly different depending on the type of document/program used.
InDesign
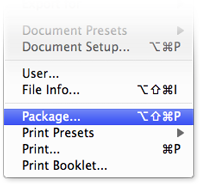 Use the Package command to collect all linked files and fonts. Some designers prefer to leave linked files and fonts in shared drives or repositories and don’t want to package them because it would cause unnecessary duplication of files. While this makes sense, it’s very hard to guarantee those files and fonts will always remain unchanged and in the same place. I’ve found it a much better to just deal with the duplication and ensure your projects always have their own copies of its necessary assets. This also means that the files are ready to move without additional work later.
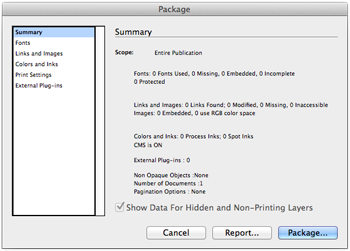 The Package dialog box provides detailed information about the file, including a list of all fonts, links and colors used in the project. It’s a great way to quickly review the color spaces or your images and check for unintended spot colors, as well. Click the Package… button to continue or click Report… to generate a text file containing the same detailed information.
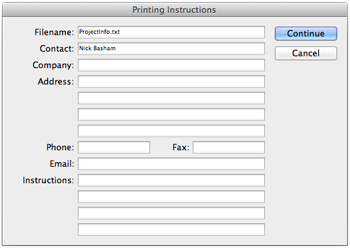 Next, you are presented with an screen named Printing Instructions – any information included here gets placed in the text file report mentioned above. I always fill in my information so a designer opening the project in the future can contact me if necessary.
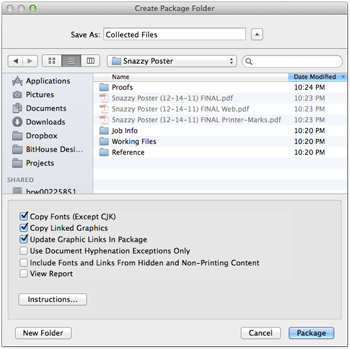 The following step lets you choose the location for your packaged files and the folder name. InDesign defaults to using the document’s filename as the folder name, but I always rename it to Collected Files. There’s no need to keep the descriptive name because this folder never exists by itself – it’s always enclosed by the larger project directory. It also ensures uniformity in my project files.
Photoshop, Illustrator & others
Photoshop embeds all files placed in it, so you don’t have to worry about collecting files for it. Illustrator can include linked files, but doesn’t have the ability package them like InDesign can. However, I almost never link files within Illustrator so I don’t need to worry about this limitation.
The Photoshop/Illustrator/other files themselves get moved into a folder named Source Files. Collected Files is only used for InDesign documents. While both folders play a similar role, I keep them distinct so I can quickly identify the structure of the project by simply opening the directory.
Clean up
 With the project complete and all source files properly collected, it’s time to clean up. Remove the now unneccessary Working Files directory. If you have no need to keep records of proofs, feel free to remove that directory as well.
The Handoff and/or archival
At this point, the project directory should be organized, containing only your file(s) labeled FINAL and the various standard folders as necessary.
Now you can move the directory wherever you need knowing all dependent files are in place without any additional work or opening old files before passing them along or archiving.